One thing I can do while snowboarding is to carve and I can do this after I have mastered the fundamentals.
It’s also crucial to mention the fact that I have to practice quite a bit. In order to carve on a snowboard, I need to follow several steps.
Table of Contents
How to Carve on a Snowboard
First, I need to build up speed, then I can lean and tilt. After this, maintain the edge and finish my carve on the snowboard. I can then combine all of the steps together and repeat them in order to complete several turns and carve properly on my snowboard.

Carving and Turning Are Two Different Things
One thing I advise that you keep in mind when considering how to carve on a snowboard is that carving is not the same as turning.
Turning is a bit more basic and it involves shifting both the board and my body from one specific orientation to a different orientation.
In other words, turning means that I move from heelside to toeside and the other way around, too. I can perform only a single turn or I can combine multiple turns in a row so that I can regulate my speed in the snow.
In contrast, I should first state that carving is definitely more advanced. This technique requires you to complete several equal turns consecutively.
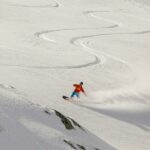
With a carve turn, I can descend steeper slopes while I maintain my flow and my rhythm while I am snowboarding. I will add that it is possible for you to notice signs of carving while snowboarding.
Snow tracks with a wide arc that descends down the face of the mountain is a clear visual example of carving.
Safety Is Key When Carving on A Snowboard
I strongly advise that you make safety a top priority when you think about carving a snowboard.
The first step in this process is to ensure that the run you are on isn’t that steep and that there is plenty of room for you to carve.
I can say that falling down is part of learning how to carve, but it is best not to put others in danger or increase the chance that you could get hurt.
A mellow run with only a few other riders is a good place to start practicing carving a snowboard.
I will add that you have to follow a series of steps to carve a snowboard.
Build Up Enough Speed
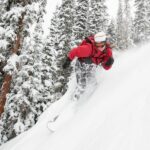
The first step that I have to complete in order to carve on a snowboard is to build up sufficient speed. It is necessary to ride pretty fast to start a carve turn.
This speed is exactly why carving on a snowboard is not a technique for beginner snowboarders. I recommend that you choose your run carefully.
After that, I like to point exactly downhill in a straight direction for a few seconds. This allows me to slowly increase my speed.
It’s vital to manage the speed properly. I do not recommend that you attempt to start a carve turn when going as fast as possible.
That said, I also recognize the fact that you do have to move a bit quickly to start carving. This careful management of speed is another reason why I do not advise beginner snowboarders to try carving.
Even for a more experienced snowboarder, managing speed like that requires a good amount of concentration. Once the speed is high enough, I think it is time to move on to the next step.
Tilt and Lean
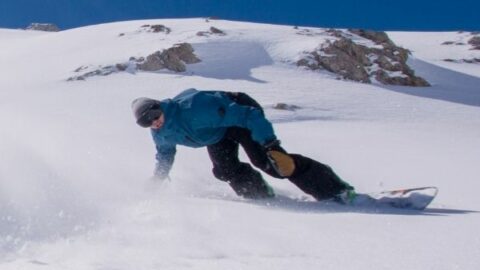
After I have sped up enough, I can then start my first carve on the snowboard. The first step in starting this is to lean in the direction that I want to turn.
However, I also have to tilt my board so one of its edges digs into the snow’s face, and the remaining edge points slightly upward.
I recommend that you extend your hips and knees back while pressing your toes into the snow when carving toeside.
It is definitely different when carving heelside. I advise that you move in the opposite way as you did when carving toeside.
Instead of pressing your toes into the snow, you should dig your heels into it while pointing your toes away from the direction of your legs.
I will add that you will have to bend at the knees more when carving heelside. It is possible that you might even feel like you are beginning to sit down when you do this.
Maintain Your Edge
It is critical for me to utilize my board’s edge for both power and control during my turn’s wide portion. I recommend that you hold this edge control for most of the turn.
However, I would say that it is vital for you to maintain edge control until you are past the carve’s fall line. This is another term for the portion of the carve that is fully committed and steep.
One thing that I advise you to do to accomplish this is to keep your body active and engaged. Look ahead of you and do your best to align your shoulders with the board.
Maintaining this proper position for all of the carve is ideal.
Finish Your Carve
At this point, I am past the fall line. I will now see that I am almost perpendicular to the mountain’s downhill slope.
This perpendicular position means that I’ve reached the conclusion of my carve. As a result, I can flatten out my board and start preparing for the upcoming turn.
The turn’s end means that I can regain my balance and make preparations for the upcoming turn which will be on my opposite edge.
Combine Multiple Turns
I will also now mention that you have to combine multiple turns in order to carve properly. Repeating all of these steps is the next part of the process.
I will add that you have to ride on the opposite edge and go in the opposite direction to do this. Start the turn in the opposite direction and watch your hips and knees carefully based on which edge is in control now.
One final point I will make about how to carve on a snowboard is that you should practice this process quite a bit until you can do it easily.
Frequently Asked Questions about Carving on a Snowboard
Should I practice with an instructor?
Practicing with an instructor is a great way to learn. It is also good since it makes learning how to carve safer, as well.
What kind of slope should I use to practice?
It depends a bit on your skill level, but I would recommend using a gentler slope to practice. This is especially true for beginner snowboarders.
Conclusion
Carving on a snowboard is definitely quite fun. However, it takes quite a bit of practice to do it correctly. You build up speed, tilt and lean, maintain the edge, and finish your carve.